How to download and use Exness Trader Mobile App? Table of Contents
- Download Exness Trader Mobile App for free
- What you need to do after downloading Exness Trader Mobile App
- Exness Trader - Managing personal information area settings
- Exness Trader - How to make a deposit
- Exness Trader - How to withdraw funds
- Exness Trader - How to Internal Transfer your funds
- Exness Trader - How to set up your accounts
- Exness Trader - How to Edit Notifications
- Exness Trader - How to add to your watchlist (favorites)
- Exness Trader - How to open an additional account
- Exness Trader - Where to find partner account details
Download Exness Trader Mobile App for free
Exness Trader is the broker’s in-house mobile app which you can download from EXNESS Official Website for free.
Exness Trader mobile app can be downloaded to your iPhone, iPad, Android, and also Tablets.
Through Exness Trader mobile app, you can manage your accounts, make fund deposits/withdrawals and also trade directly by accessing global markets.
Dowwnload Exness Trader mobile app
How to manage your Exness account settings
This article will help you learn how to manage your account settings, such as:
- Account Type:
- Once registered, you cannot change it, but you can open a new trading account in the current personal information area and choose a different account type.
- Account Currency:
- If you need to change it, you can open a new account and choose a different account currency.
- Account Email:
- If you want to set up a different account email, you need to register a completely new personal information area.
- Personal information:
- To change, you must contact Exness’s customer support team. Please have your password ready in advance for expedited processing.
To get started, log in to the client area.
1. How to change the Leverage of your Exness account?
- In the Personal Information area, select My Account.
- Click the gear icon of your trading account to open its settings.
- Select Change Leverage and then select a leverage percentage from the drop-down menu. Then click Set Leverage.
- Now enter the 6-digit code sent as the security type and click OK.
The leverage is now set.
Please note that if you select leverage that is not applicable to your account type, the setting will be restored to the last allowable leverage and in some cases, it may be set to the default of 1:200.
2. How to change the Nickname of your Exness account?
To set a nickname for your account, please follow these steps:
- In the Personal Information area, select My Account.
- Click the gear icon of your trading account to open its settings.
- Select Rename account and a pop-up window will appear.
- After setting the account name, click Change Account Name to complete the setup.
Your nickname will now appear in your trading account.
How to open Forex trading account with Exness?
3. How to manage the Read-only access of Exness account?
Setting a read-only password allows you to share account access with third parties.
Third parties can verify their trading account, but cannot trade.
- In the Personal Information area, select My Account.
- Click the gear icon of your trading account to open its settings.
- Select Set Read-Only Access and a pop-up window will appear.
- Create a password and confirm by clicking Set Read-Only Password.
- You will now receive a 6-digit code as the security type. Enter this code and click OK.
You have now set a read-only password on your trading account.
4. How to start trading Crypto on Exness account?
The trading password is used to log into the trading terminal program with a specific trading account and can be changed by following the steps below.
- In the Personal Information area, select My Account.
- Click the gear icon of your trading account to open its settings.
- Select Change Trading Password and a pop-up window will appear.
- Enter your password and confirm by clicking Change Password.
- Now enter the 6-digit code sent as the security type and click OK.
Your trading account password is now set up.
See the list of Cryptocurrency markets on EXNESS
What you need to do after downloading Exness Trader Mobile App
After registering on the Exness Trader App, you need to complete the steps below.
- Phone number verification
- Enter personal information
- Enter economic profile
- Identity verification
- Residence verification
Address and identity verification steps are very important to keeping your accounts and financial transactions secure.
The certification process is one of many measures Exness has implemented to ensure the highest level of security.
Download EXNESS Trader Mobile App
1. Phone number verification (completed during the registration process)
The first step in verifying your profile is to enter a valid phone number. This process is completed upon account registration in the Exness Trader application.
After completing registration with a valid email address and setting a password for the privacy area, you will be prompted for a phone number.
- Enter your phone number. Tap Send Code.
- Enter the verification code sent to your mobile phone.
- Click Continue.
Log in to EXNESS Client Portal
2. Enter personal information:
Tap the profile icon to enter.
- Click Continue under Account.
- Enter detailed information such as full name, date of birth and address.
- Click Next.
3. Enter the economic profile
The next step of certification is completing the economic profile.
It contains basic questions such as the source of income, the industry you work in, and trading experience.
Enter the details and click Next.
4. Identity verification
Identity verification is very important to prevent identity theft and fraud.
- Select the country where the proof of identity (POI) document is issued for self-authentication, then select the document.
- Make sure that the following requirements are met in the document.
- It must be clear and readable.
- All four corners must be visible.
- Both the photo and signature must be clearly visible.
- The document must be issued by the government.
- Acceptable file formats: JPEG, BMP, PNG or PDF.
- The document size cannot exceed 15MB.
- Upload the document and click OK and Continue.
Documents are reviewed and account status is automatically updated.
You will receive a confirmation email once your identification document has been successfully verified.
You can proceed with the proof of residency step right away or continue later.
5. Proof of Residence
Complete the Steps of Proof of Residence by submitting proof of residency (POR) documents.
Once POI verification is complete, you can upload proof of residence (POR) documents. Go to your profile icon at the top of the screen to verify your account.
Click Authenticate.
Make sure your document meets the following requirements:
- It must be clear and readable.
- It must be a recent document (issued within 6 months).
- Must include your full name and residential address (mailboxes are generally not allowed in the address).
- All four corners must be visible.
- The document must be issued by an independent and trustworthy organization.
- Acceptable file formats: JPEG, BMP, PNG or PDF.
- The document size cannot exceed 15MB.
Click Upload Proof of Residence and upload your document. Click Next.
Documents are reviewed and account status is automatically updated.
You can also log in to the website to complete profile verification.
Having trouble uploading your documents? Check out Exness’s troubleshooting guide.
Log in to EXNESS Client Portal
Exness Trader – Managing personal information area settings
The Exness Trader App allows you to access and manage your client area on the go.
We’ll show you how to access and manage it.
1. Home screen
Once you have successfully registered your account with the Exness Trader app, you will be able to access the personal information area and view the home screen.
There are a number of great features on this tab that will appeal to you, including the ability to see the quotes of your favorite trading products at a glance.
Which Exness’s account type is the Best?
2. Manage your account
You can check your trading account in the upper section of the home screen and open an account if you wish.
Click the top drop-down menu and choose between mock, real, partner or crypto accounts and swipe the section below to view your account.
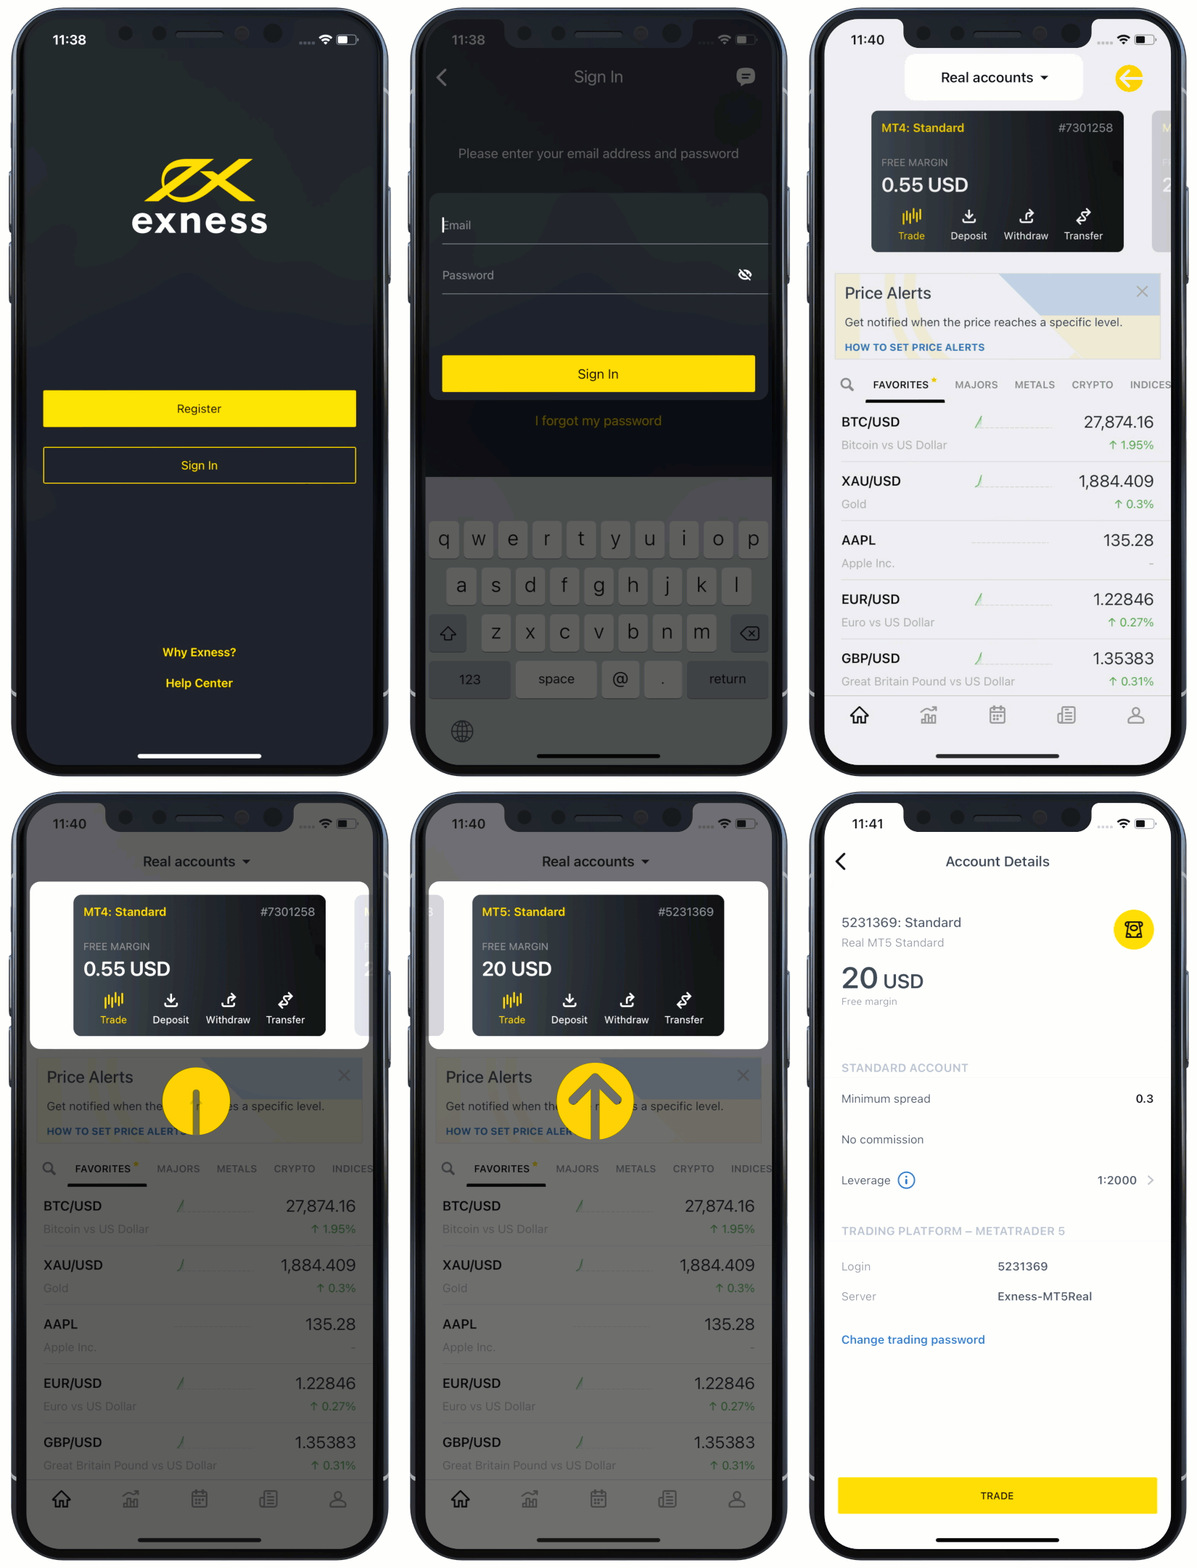
On this screen, you can check and trade the current daily deposit balance for each account, and deposit or withdraw funds.
Tap the account you want to select to open its settings.
From this screen, you can edit details such as leverage and trading password for a specific account.
To open an additional account, click the dropdown and select Open New Account.
3. Market trend
Under the Accounts section, there are several tabs containing market products grouped into different groups.
Browse the categories to find the trading product you want.
When you find a product, swipe left on it and click the star to mark it as a favorite.
All your favorite products appear on the Favorites tab, so you can see market trends at a glance.
4. Trading signal
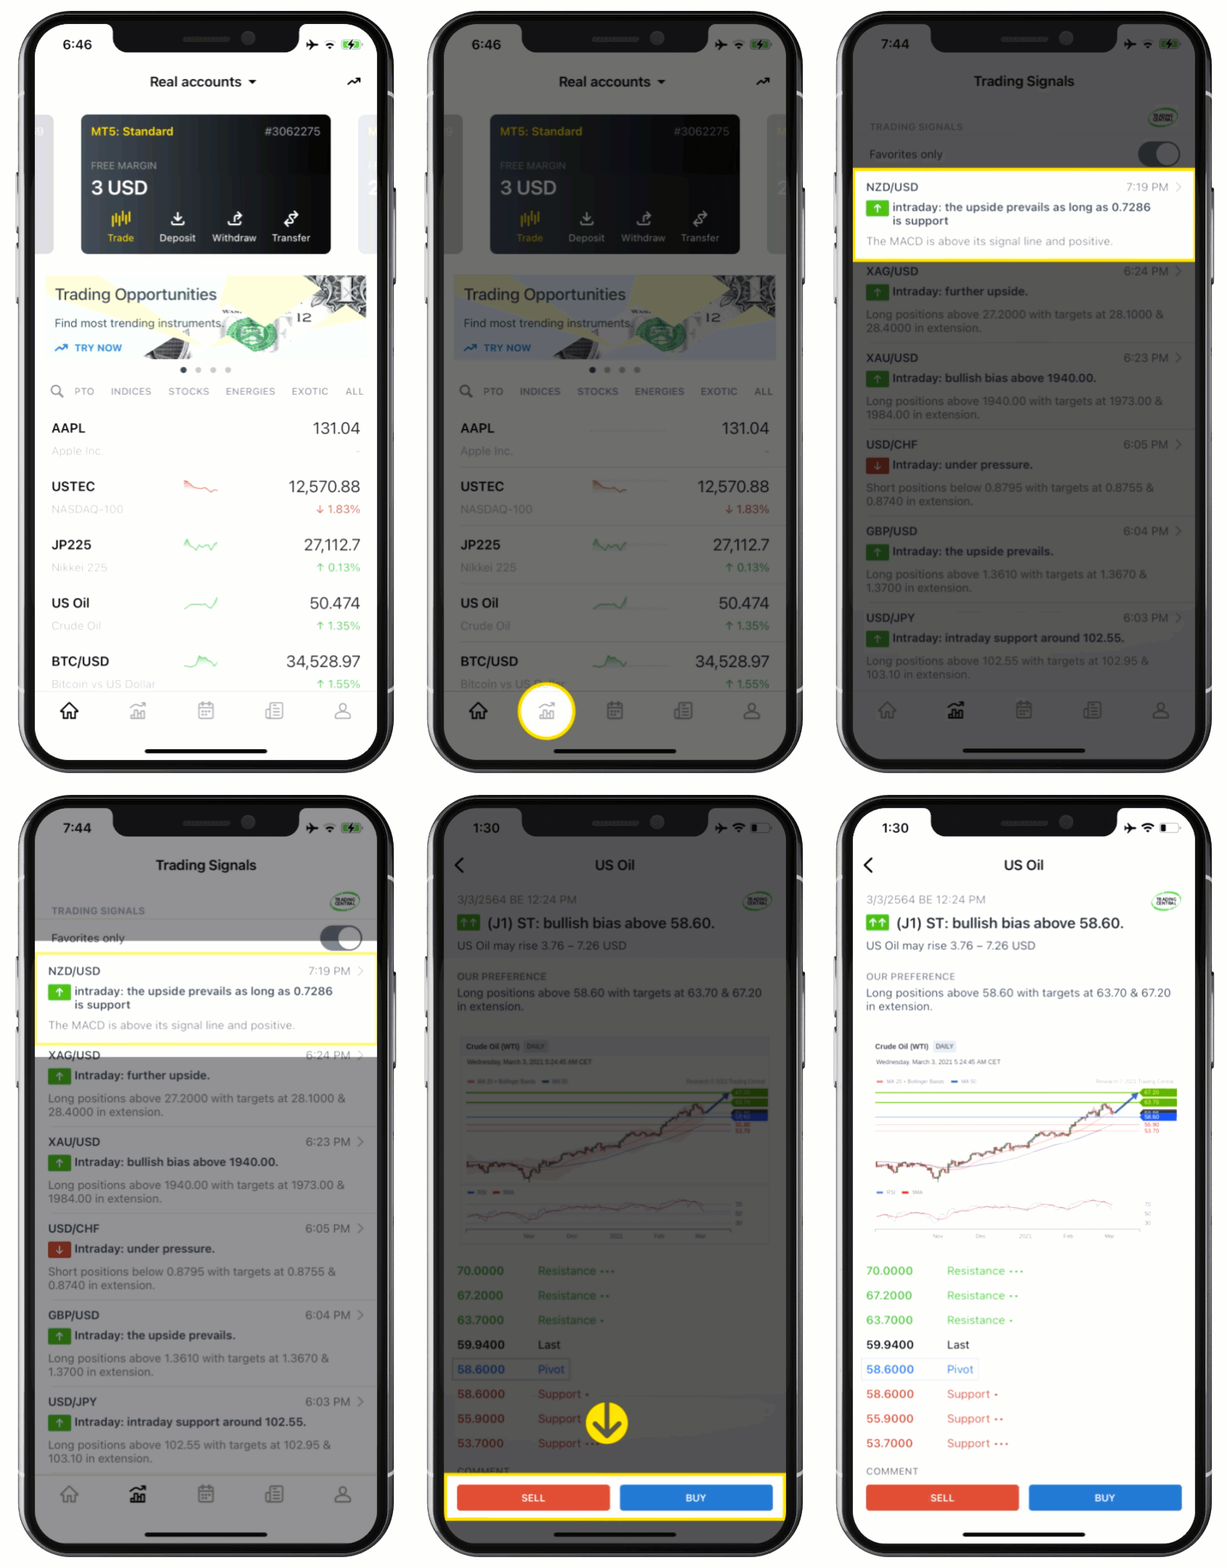
In the tab right next to the home you can see some very useful trading signals from Trading Central and get insights into the expected trends of your trading instruments.
Tap this tab to view the forecast report and trade by tapping Sell or Buy on that screen.
Press’Favorite Only’ to see only signals related to the products you are interested in.
Find out more about EXNESS’s Trading Signals
5. Economic calendar
The economic calendar included as a standard in the Exness Trader app (Credit: Fx Street News) shows key financial events in several countries that could potentially affect the currency.
This can be filtered by country and volatility by tapping the icon in the upper right corner of the screen.
6. News tab
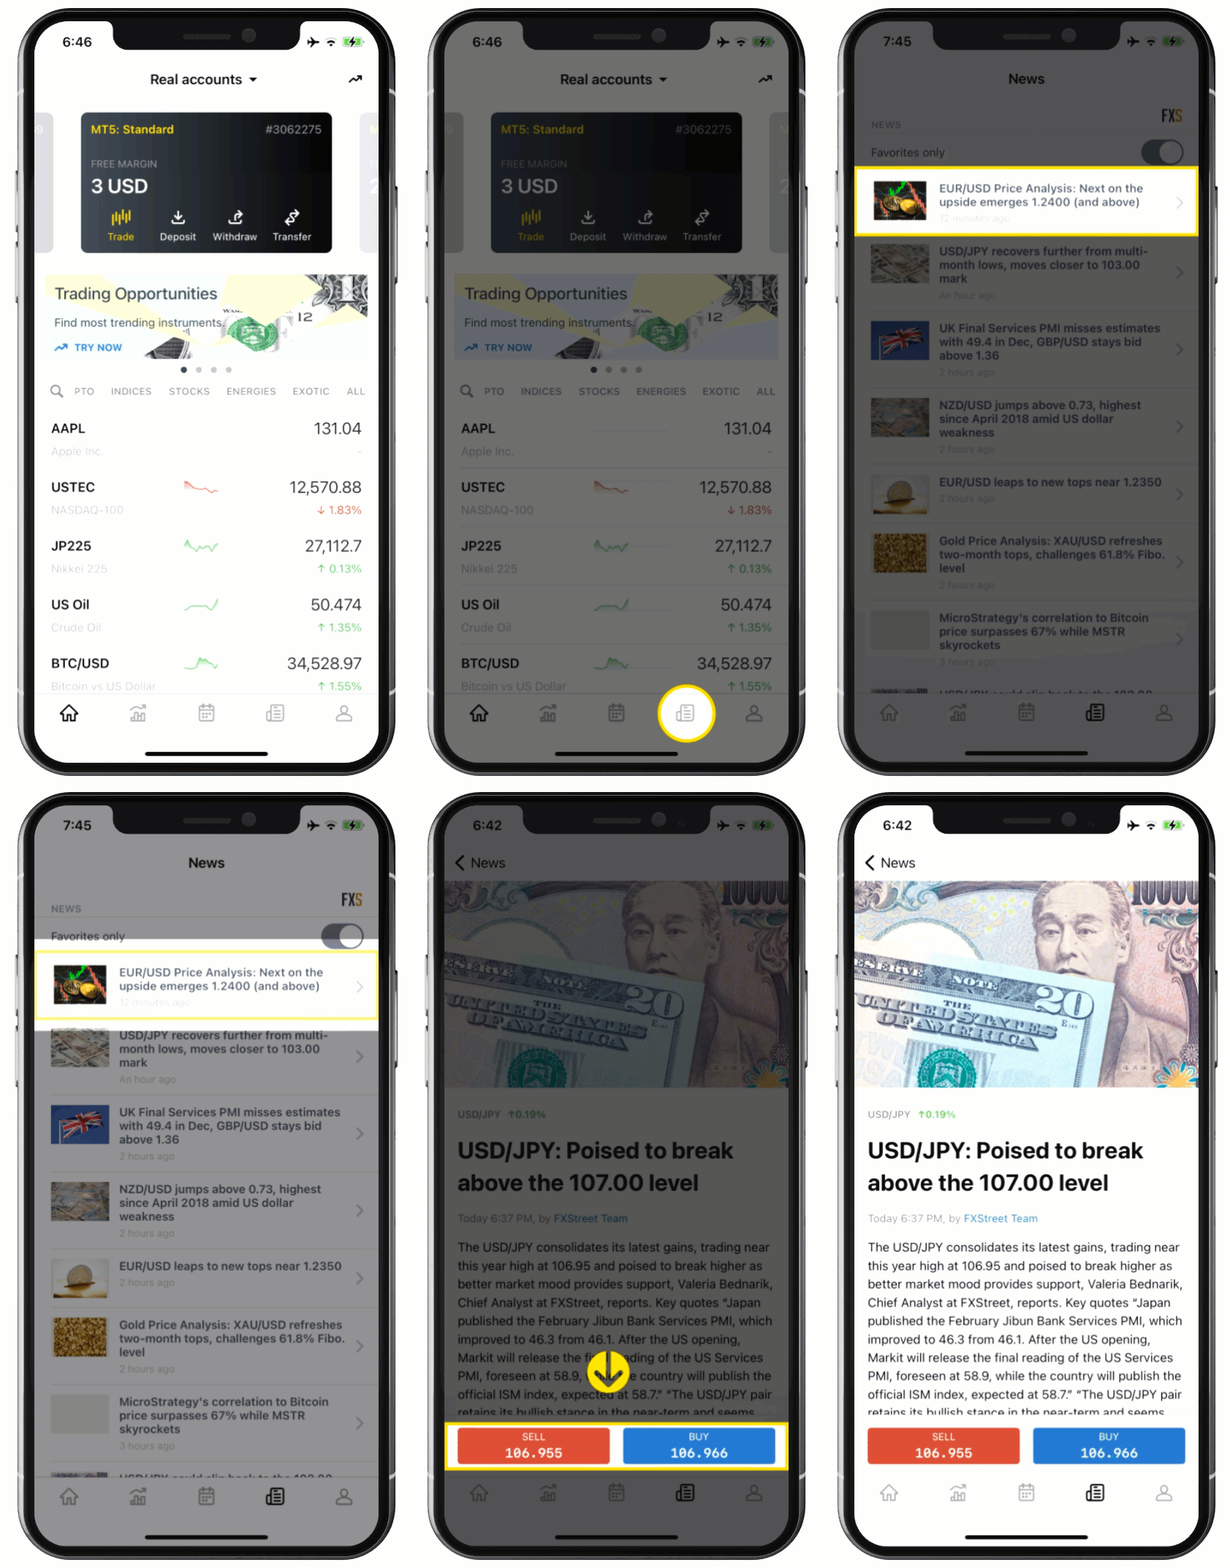
The News tab contains important financial news from around the world and can be accessed directly from the app.
This makes it easier to make trading decisions.
You can read the full article by tapping on a news headline, and trade by tapping Sell or Buy on that screen.
You can only view news related to the products you are interested in by clicking ‘Favourites Only’.
7. Setting up notifications
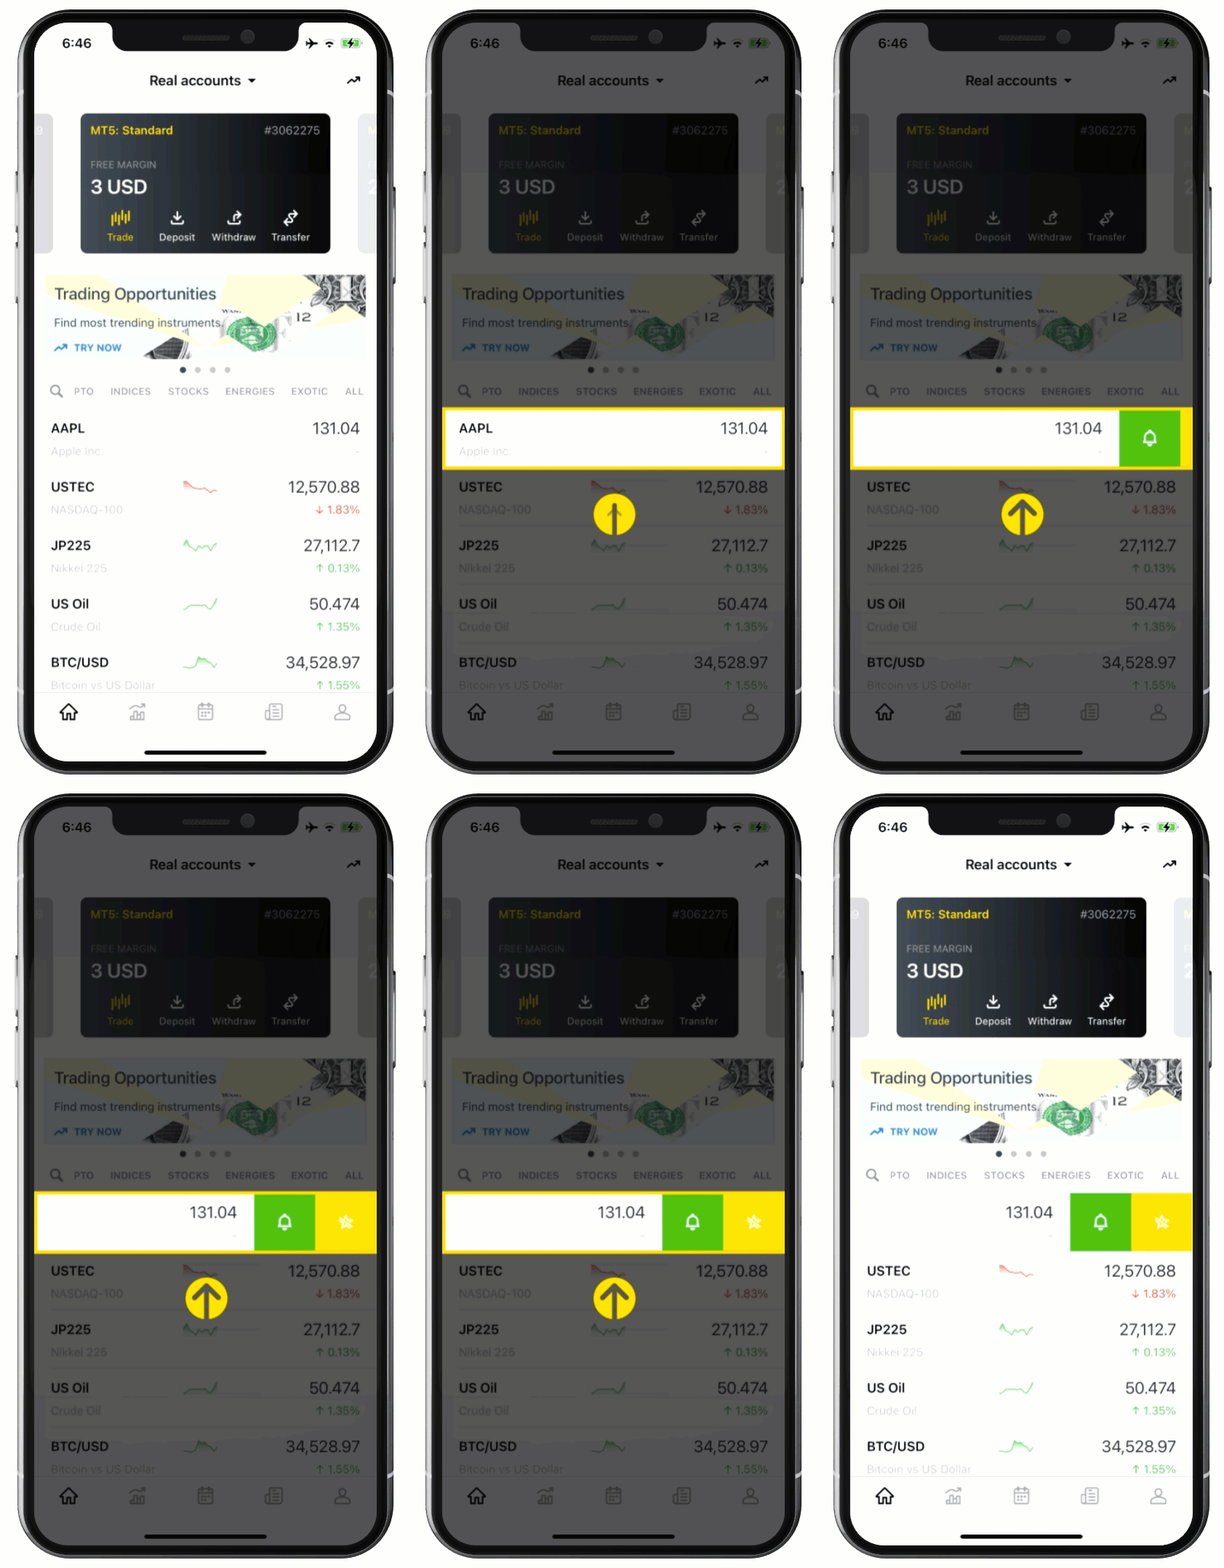
Notifications are designed to notify you of market fluctuations in selected instruments, so you will never miss a trading opportunity.
To set an alert, swipe left on a product in the quote and click the bell icon You can also click the bell icon in the top right corner of the product page.
Set the details and hit Set Notifications.
Open EXNESS Real or Demo Account
8. Profile tab
On the Profile tab, you can manage many useful features, such as:
- Account verification completed
- Share partner link
- Use of the trader calculator
- User settings such as desired trading terminal program, app language and security type
- Access to help center
- Participation in live chat with Exness customer support team
- Confirmation of corporate legal documents
- Suggested features you want to add to the app
- Log out of the app
Exness Trader – How to make a deposit
In this section, we have prepared a guide for making deposits easily with the Exness Trader App.
- On the main screen, tap Deposit from Account. If you want to read more about how to find an account, read this article. You can also open the settings by clicking on an account. Tap the Financial Actions icon at the top to open the options. Click Deposit.
- Select a payment method from the list of options. The payment methods available may vary based on the region in which you have registered your personal information area. If you only want to see payment methods that run immediately, set Pay Immediately Only.
- Enter the required information including the amount you wish to deposit and the desired currency. Deposit limits are displayed in the app for convenience (if applicable). Click Continue.
- On the payment confirmation page, verify the details and click OK. Go to the site that provides payment services and complete the transaction.
- Once you have completed the transaction, you will be able to see details such as the transaction ID and transaction status.
All done. Now you have learned how to deposit in the Exness Trader App.
See available fund deposit methods on EXNESS
Exness Trader – How to withdraw funds
We will show you how to withdraw with the Exness Trader App.
To withdraw:
- From the main screen, tap Withdrawal from the account. If you want to learn more about how to find an account, read this article. You can also open the settings by clicking on an account. Tap the Financial Actions icon at the top to open the options. Click Withdraw.
- Select a payment method from the list of options. The payment methods available may vary based on the region in which you have registered your personal information area. If you only want to see payment methods that run immediately, set Pay Immediately Only.
- Enter all required information and click Continue. The required information you need to enter may vary depending on your payment method.
- Enter the verification code sent as the security type. Press Submit.
- The transaction confirmation page appears with the transaction details.
All done. Now you have learned how to withdraw from the Exness Trader App.
See available fund withdrawal methods on EXNESS
Exness Trader – How to Internal Transfer your funds
Internal transfers are currently only possible between accounts within the Personal Information Area (PA).
- To transfer, tap Transfer on the account you want to withdraw.
- On the next page, you will be asked to select an account number to transfer money to. Enter the details and click Next.
- The verification code is sent as a security type. Enter this code to complete the transaction.
You are done! In this way, you can transfer funds internally with the Exness Trader App.
Log in to EXNESS Client Portal
Exness Trader – How to set up your accounts
With the Exness Trader application, you can easily change your account settings from anywhere.
1. Locate an account
To change the settings, you first need to find an account.
You can switch to mock account, real account, and partner account from the Account dropdown at the top of the main screen. T
o find an account, click on the appropriate category and then click on any of the displayed accounts to activate it.
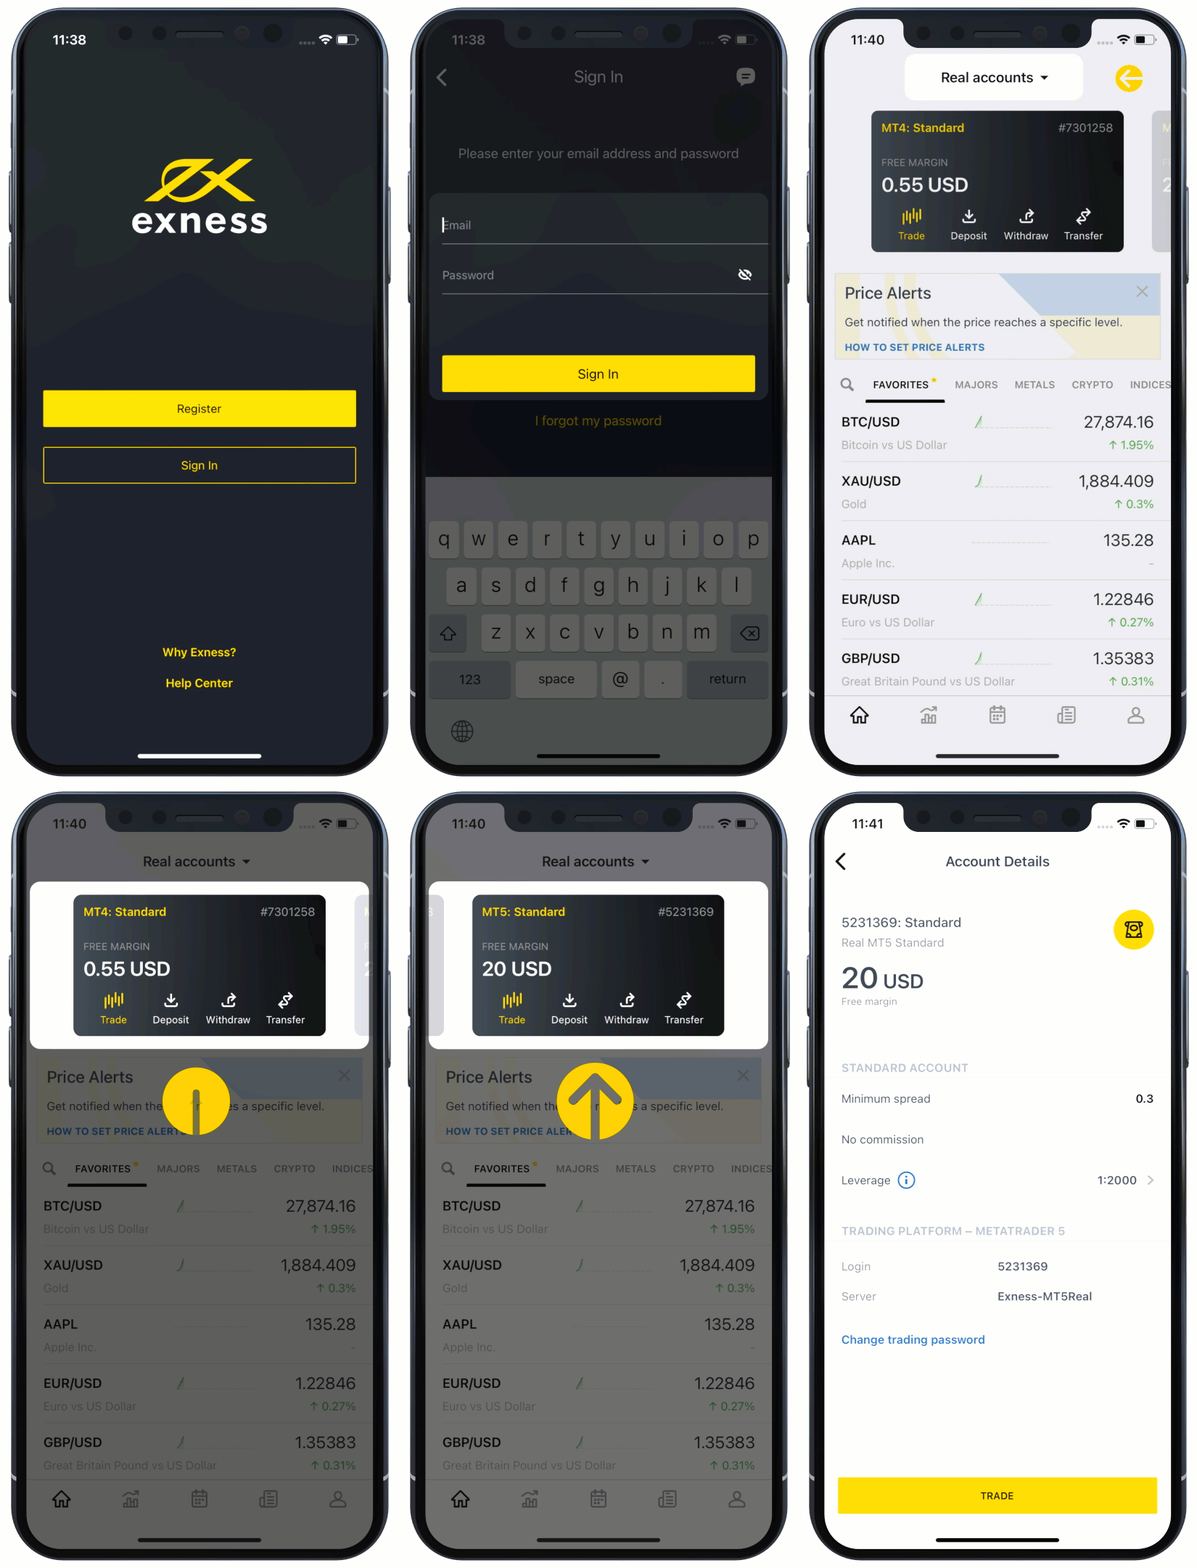
Clicking on an account opens a list of settings.
2. Change your leverage
You can check the leverage already set in your account.
- Press the displayed leverage and select the desired leverage.
- Enter the 6-digit verification code sent as the security type.
- Click Authentication.
Changing your trading password
To change your account’s trading password:
- Tap Change Trading Password.
- Enter a password that meets the indicated requirements. Click Continue.
- Enter the 6-digit verification code sent as the security type.
- Click Authentication.
Find out more about the Leverage on EXNESS
Exness Trader – How to Edit Notifications
You can edit the types of notifications you receive from Exness Traders. Here’s how:
To edit a notification:
- Click the Profile icon. Tap the notification.
- A list of services that can be notified is displayed. All are checked by default. If you do not want to receive notifications for a specific service, you can uncheck it.
Notifications are sent only when a product is marked as a favorite.
You can edit the list of favorite products by clicking on a product.
You can also mark a product as a favorite by clicking the star on the main page.

Exness Trader – How to add to your watchlist (favorites)
Adding products to your favorites list (formerly known as your wish list) is a great way to keep track of the price fluctuations of the products you are interested in.
Here’s how to add it:
- When you log in to the Exness Trader App, you will see a list of popular products in the Favorites tab by default.
- To add a commodity to this list, tap on your favorite commodity group, such as cryptocurrency, metal, etc., or tap All to see the full list of trading instruments offered by Exness.
- Swipe left to reveal star options. Tap a star to mark it as your favorite product. For right-to-left languages, swipe right. You can also open the product details and click the star at the top of the screen.
- Likewise, to remove a product from your favorites list, swipe left and unstar it.
You can also set up push notifications for your favorite products. Read this article to learn more.
Open EXNESS Real or Demo Account
Exness Trader – How to open an additional account
To open an additional account (MT4 or MT5), open the options by clicking on the dropdown of the account at the top of the screen.
And do the following steps:

- Tap Open New Account.
- The accounts available for each type are displayed. Tap the account you want to open.
- Set the desired account currency, leverage, and nickname. Click Continue.
- Set a trading password that meets the requirements displayed and tap Continue again.
All done. Your account is now open. You can deposit and start trading.
Exness Trader – Where to find partner account details
Partner accounts can be found in the Account drop-down menu at the top of the screen.
Tap the menu to open the options, then click Partner Account.
Click on the account and you will see the following details:
- Partner account number
- Account balance and withdrawal options
- Total fees earned
- Total number of customers you recommended
- Partner links that can be copied and shared. You can also tap Invite Friends to share the link to download the Exness Trader application directly to your friends or acquaintances.
Sign up to become a partner of EXNESS
Please check EXNESS official website or contact the customer support with regard to the latest information and more accurate details.
EXNESS official website is here.
Please click "Introduction of EXNESS", if you want to know the details and the company information of EXNESS.


 IronFX

FXGT Broker Review: A Leader in High Leverage Forex and Cryptocurrency Trading
Comment by whatisgoingonTRUMP
February 17, 2025
Trump’s team holds 80% of the $TRUMP token supply, giving them the power to influence prices and put investors at risk. A crypto controlled by one group? Doesn’t seem very decen...